
The convertible glass rear windows of Audi (TT, A3, A4, A5, etc.), VW (Beetle, Golf, etc.), Mini (R 57) BMW (1 Series E88) and various other brands are directly glued to the soft top fabric without a frame. This bonding comes off completely or partially after about 10 years.
Causes are normal environmental influences (e.g. solar radiation, humidity, etc.) and frequent impregnation with solvent-containing impregnators from the spray can. Solvents cause hardening of the adhesives and thus reduce adhesion. The use of the incorrect cleaning agents (containing acids or solvents, etc.) also damages the bonding. A new convertible top costs up to 5,000 EURO / USD including installation and can exceed current value of the vehicle. We have worked intensively on this topic and have developed a do-it-yourself repair solution.
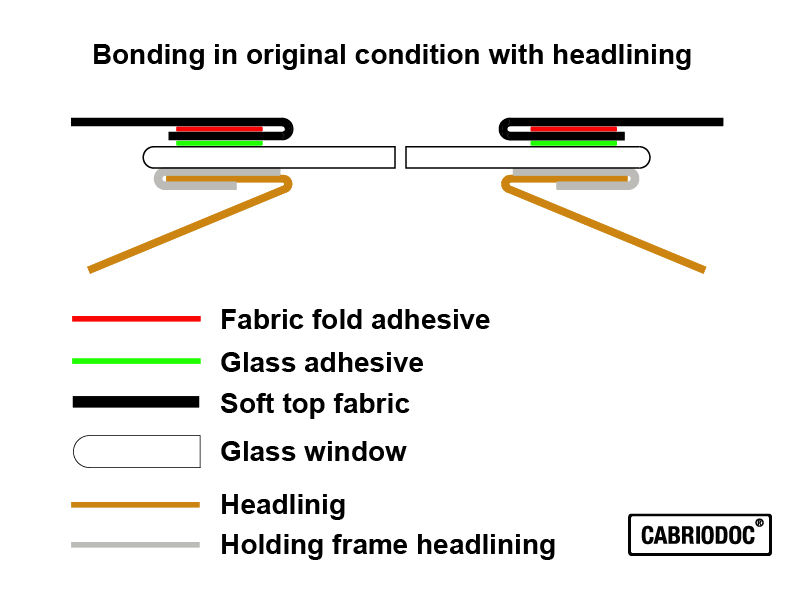
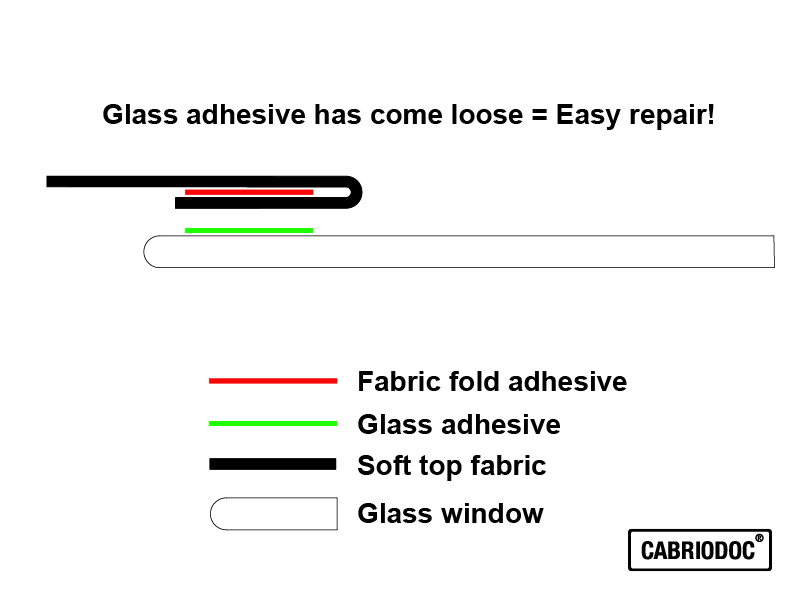
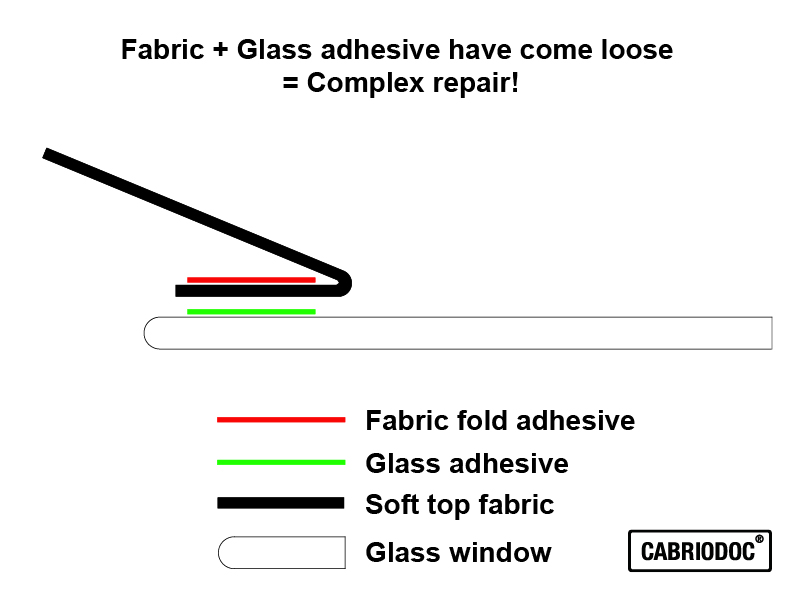
In order to have a clean finish to the convertible top window, the soft top fabric was folded and glued at the factory. If this bonding has also come loose, the glass adhesive will be extremely stressed. Every time the soft top is opened and closed, the soft top fabric is pulled off the glass window almost vertically. Therefore, if you only replace the glass bonding and ignore the fabric fold bonding, you will not achieve a long-lasting repair result. Rebonding the fabric fold is complex. In order to access the fabric fold bonding, the inner headliner (not available on all vehicles!) must be completely or partially removed.
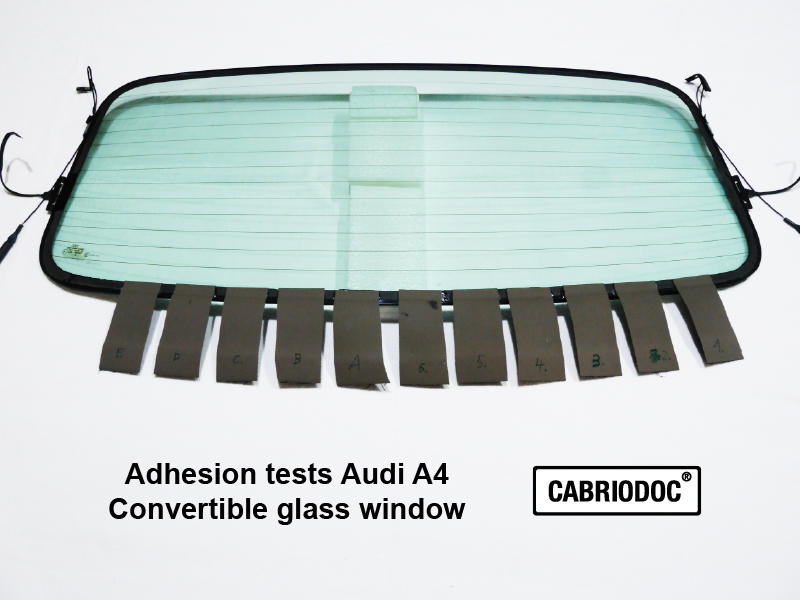
Adhesives - Bonding tests
We have tested almost all commercially available types of adhesive on used original convertible tops. All adhesives have more or less failed. The main problem was the resistance to high temperatures. The soft top and the window can heat up to 80°C to 90°C when exposed to sunlight. Commercially available adhesives are temperature resistant up to 80°C according to the manufacturer. But be careful, these manufacturer's specifications are greatly exaggerated. The "special adhesives" offered on Ebay and Amazon (usually "epoxy resin adhesive" or "two-component structural adhesive") for convertible glass rear windows have also failed here. These "epoxy resin special adhesives" are sold on Ebay and Amazon for 20-30 EURO / USD. Fully comparable 2K epoxy resin adhesives cost 8-10 EURO / USD at the hardware store.
Various epoxy resin adhesives are recommended in the forums. These are offered either in tubes or in syringes without mixing tubes. Without a precision scale, however, it is not possible to mix these adhesives 1:1. If the mixture is not correct, the adhesive cannot adhere well. Also, when mixing manually, air bubbles are automatically added, which is not optimal for curing and function. Epoxy resin adhesives are completely rigid when cured and they cannot absorb stretching and vibration. Epoxy resin adhesives are also fluid and run on sloped repair areas.
Conclusion: Epoxy resin adhesives are not suitable!
So we have tested special industrial adhesives. The CABRIODOC 2K Rapid Adhesive is supplied in professional syringes with a 1:1 automatic mixing tube and is resealable. We were also able to reduce the usual curing time of 24 hours to 12 hours. CABRIODOC 2K Rapid Adhesive is easy to process and does not run. After complete curing, the black adhesive is highly flexible and can withstand temperatures from -30°C to + 90°C. The adhesive can be used for fabric fold bonding (fabric to fabric) and glass bonding (glass to fabric).
WARNING
We strongly advise against using standard adhesives and especially silicone for repairs. They won’t stick, and it will be very difficult to perform a professional repair afterward, since the incorrect adhesives must be completely removed. If the window has been bonded with silicone, it can no longer be re-bonded. Silicone cannot be completely removed and acts like a film of oil.


Bonding with clamping tool
A special tool is required for professional bonding. The soft top fabric must be fixed to the glass window with the necessary pressure until the adhesive has cured. We have developed a special clamping tool with a suction cup for this purpose.
Repair instructions (version 08.14.2026)
For the repair, the soft top must be opened slightly to allow it to relax.
The repair requires patience and a bit of manual skill. Set aside several hours and follow the instructions carefully. This is the only way to ensure the repair is successful.
Very important!
All traces of the old adhesive must be completely removed before you start reapplying the adhesive. This applies to all old adhesive residues in the fold, on the fabric and on the window. On the window, the black primer (i.e. the UV-protective layer for the old adhesive) must also be removed. In addition, peel back the seemingly intact bonding on the right and left by approx. 10 mm and remove the old adhesive there too, as the old adhesive no longer adheres fully in these areas. Mask the window with masking tape to protect it from scratches and remove the tape again before bonding, as the suction cups will not adhere to the masking tape. The old adhesive can be removed chemically and mechanically. First, dissolve the old adhesive using a solvent such as acetone or MEK (Further information on MEK can be found at the end of the instructions), then remove it mechanically using abrasives (e.g. sandpaper) or small milling cutters (e.g. a Dremel multi-tool with a milling or grinding head). This is followed by a final chemical clean using the solvent. Allow the solvent to evaporate for approx. 30 minutes.
First check whether only the bonding on the glass window has come loose, or whether the fold bonding on the reverse side of the soft-top fabric has also come loose. In this case, the fold bonding must be repaired first. Only once it has fully cured, the window can be re-bonded.
For the repair, you will additionally need the following tools:
Powder-free disposable gloves, acetone or MEK solvent, a vacuum cleaner, coarse sandpaper or a small milling tool , and something to cover the car body. If the seam bond is also defective, you will also need foldback clips.
The ambient temperature must be between +10°C and a maximum of +30°C. The soft top must be completely dry. Do not carry out the bonding in high humidity. Do not carry out the bonding in direct sunlight. Optimal repair environment: a dry garage.
Tip for the colder months: You can use the car’s heating to warm up the soft top. This allows the repair to be carried out even at low temperatures. Warning: Risk of poisoning from exhaust fumes!
Attention
The adhesive has a application time of approx. 25 minutes. During this time, the parts must be joined together. After 25 minutes, the adhesive will no longer bond. The 25 minute rule also applies to the residual quantity in the mixing tube. If necessary, put on a new mixing tube and dispose of the first 2 cm (0.8 inch). The mixing ratio is not yet correct for the first 2 cm (0.8 inch). The adhesive is therefore unusable here. In case of longer detachments the repair must be done step by step. For this reason, we recommend using a maximum of two sets (2 x 7 pieces) of the clamping devices. The clamping tools should only be removed after approx. 4 hours. The adhesive is partially cured after 4 hours, so it is not yet fully loadable. After 12 to 24 hours, the adhesive is fully cured and can be loaded.
Cover vehicle
Cover the working area extensively (e.g. with an old bed sheet). This prevents scratches and adhesive residue on the vehicle.
Cleaning the glass window
The soft top and the window must be clean and dry. There must be no residue of impregnating agents on the window, otherwise the suction cups of the clamping tool cannot adhere. So test the suction before repairing.
Rebond fabric fold
If necessary, first rebond the fabric fold (fabric to fabric). This also applies to areas where the window bonding is still intact. To re-bond the seam, you will also need foldback clips (available as accessories in our shop) to hold the bond in place until it has cured. Only then can the window be rebonded to the fabric, step by step.
Rebond fabric to glass window
Prepare the adhesive. Apply the adhesive in a wavy pattern, approximately 1–2 mm thick, to the bonding surface of the window. Do not apply the adhesive too thickly. The final thickness should be no more than 1 mm after compression with the clamping device. If the adhesive is applied too thickly, it may peel away from the window after a short time. Use a brush to thoroughly work the adhesive into the right and left ends of the new bond to achieve an optimal transition to the intact original bond. After pressing the adhesive into place, it should cover the entire former bonding surface, which is approximately 1 cm wide. The adhesive should ooze out onto the window by about 1–2 mm beyond the bonding surface. This excess adhesive is then mechanically removed with a scraper after it has fully cured for 12 to 24 hours.
Slightly moisten the suction cups of the clamping tool with water and place them with some distance and carefully tighten the clamping screws. Remove after 12 hours.
After 12 to 24 hours, carefully remove the excess adhesive with the scraper. First, use the scraper to make a vertical cut into the adhesive at the edge of the soft top fabric, and then scrape off the rest in a flat motion. Do not remove the excess adhesive with solvents or other chemicals.
Tip from the expert
The old contact adhesive used in fold bonding is very difficult to remove. We recommend using MEK solvent = butanone (often also called methyl ethyl ketone, abbreviated MEK) Caution! MEK has a longer flash-off time than acetone and must not be used on intact bonds, as this will damage them. You can find various suppliers via Google. Search term: “MEK solvent”
Repair failed. Common mistakes:
Bonding
Only skimmed through the instructions and then performed the repair under time pressure.
Preparatory work not carefully carried out as described in the instructions. Old adhesives and black primer not completely removed from the window, the fabric, and the fold.
Adhesive applied too thickly or not over the entire surface. Recommended final thickness after compression with the clamping device: approx. 1 mm.
Failure to observe the adhesive’s working time of approx. 25 minutes. This drastically reduces adhesion.
Ambient temperature during the repair was too high or too low. Vehicle parked in the sun to allow the adhesive to cure.
You purchased only our adhesive and applied it without our clamping device.
The soft top fabric was bonded to the windshield with too much tension. As a result, the bond is shifted too far toward the center of the windshield.
The soft top fabric is unusable due to age. New soft top fabric is three-layered: fabric – rubber – fabric. Over time, the rubber layer breaks down and the fabric layers separate. The fabric then feels very soft. Bonding is impossible in this condition.
The suction cups on the clamping device do not hold onto the windshield:
A specialist failed to mask off the windshield during waterproofing and ruined it with the spray-can waterproofing agent. The suction cups cannot grip this rough layer. This colorless layer must be removed mechanically and chemically before the repair. Moisten the suction cup before starting the repair and test its adhesion.
The repair kits are sold exclusively through our webshop
Complete set
CD 2K Rapid Adhesive black 35 g double syringe resealable + 3 x mixing tube.
for approx. 150 cm (59 inch) gluing approx. 1 cm (0.4 inch) wide. Fold bonding (fabric with fabric). Glass bonding (glass with fabric)
CD Clamping tools (plastic) 6 pieces straight for a rebonding of approx. 50 cm (20 inch) + 1 piece curved for the corners
CD cleaning cloth set with 3 pieces
CD Abrasive fleece approx. 100 x 50 mm ( 4 x 2 inch)
CD masking tape 30 mm x 50 m (1.18 x 1968 inch)
CD Mini scraper
CD Brush
Adhesive set
CD 2K Rapid Adhesive black 35 g double syringe resealable + 3 x mixing tube resealable
for for approx. 150 cm (59 inch) gluing approx. 1 cm (0.4 inch) wide. Fold bonding (fabric with fabric). Glass bonding (glass with fabric)
Classification of the substance or mixture Regulation (EC) No 1272/2008 (CLP): none. CLP labeling requirement: none.
Clamping device set
CD Clamping tools (plastic) 6 pieces straight for a rebonding of approx. 50 cm (20 inch) + 1 piece curved for the corners
Mixing tube set
CD mixing tube set with 3 pieces
For all sets NOT included:
Powder-free disposable gloves, solvent acetone or MEK, vacuum cleaner and something to cover the car body (e.g. an old bed sheet).